“Christmas Workshop,” Friend, Dec. 1990, 8–9, 22–23
Christmas Workshop
Pop-Up Card
To make each card, you will need: a 4″ x 6″ (10 cm x 15 cm) piece of colored construction paper, white paper, a pencil, various colors of construction paper, glue, markers.
-
Fold the 4″ x 6″ (10 cm x 15 cm) paper in half to make a card. Write a greeting on the outside.
-
Trace the card pattern on this page, one of the patterns on the next page, or another simple design that you like onto a piece of white paper, and cut it out. (If you are not using the card pattern, fold your pattern in half, then add a flap on the outer edge of it.) Fold a piece of construction paper in half and trace the copied pattern onto it, then cut out. Do not cut along the folded edge.
ImagePop-Up Card -
Fold the flaps in, and glue to the card, as shown. For variety, add detail and background designs using markers, construction paper, Christmas wrap, or stickers.
-
Sign the inside of the card and give it to a friend or family member.

Spiral Bell
To make a simple bell, you will need: a 2″ (5 cm) square of wrapping paper or colored paper, a 2″ (5 cm) round lid, a pencil, scissors, and string.
-
Trace around the lid onto the paper and cut out.
-
Cut the circle into a spiral, as illustrated, making the cut about 1/8″ (3 mm) wide.
-
Cut an 8″ (20 cm) length of string; double it, and tie it to the center of the ornament. Hang it on a tree, or tie it to a package.
Sandwich-Bag Quiet Book
To make a quiet book for someone in your family, you will need: sealable plastic sandwich bags; a hole punch; yarn or ribbon; scissors; Church publications that may be cut up, such as magazines, Church News, old manuals.
-
Punch holes in the bags as illustrated.
-
Choose pictures that you like to look at and that will help the person you are giving the book to, to be reverent during sacrament meeting.
-
Trim the pictures to fit inside the bags.
-
Slip two pictures back-to-back inside each bag; seal the bag.
-
Tie the bags together with yarn or ribbon.
One of the nice things about this book is that you can change the pictures anytime that you want by simply unsealing the bags and replacing the old pictures with new ones.
Paper Garland
To make a paper garland, you will need: white paper, a pencil, colored paper, scissors, glue, and markers.
-
Trace one of the patterns below and cut it out. Cut a strip of paper at least as wide as the height of the pattern. Trace the pattern onto one edge of the strip of paper, then accordian-fold the paper the width of the pattern.
-
Cut around the traced pattern. Do not cut where there is a dashed line.
-
To make a long garland, cut several holly leaves out of green construction paper, using the pattern given. Draw red berries on the holly with a marker. Glue the edges of two garlands to the back of the holly (see illustration), and let it dry. Make long garlands of all one design, or alternate designs.
Designer Bag
To make a designer bag, you will need: a paper lunch bag, scissors, white paper, a pencil, markers, and colored tissue paper or wrapping paper.
-
Without unfolding it, cut the top of the bag like one of the two designs shown.
-
Trace one of the patterns below onto white paper and cut it out. Trace the copied pattern onto the front of the bag and carefully cut it out of the bag.
ImageDesigner Bag -
Decorate the front of the bag with markers, then line it with the colored tissue paper or wrapping paper, so that the paper shows through the cutout section of the bag.
-
Use your designer bag as a wrapping for a gift or to take treats to friends during the holidays.
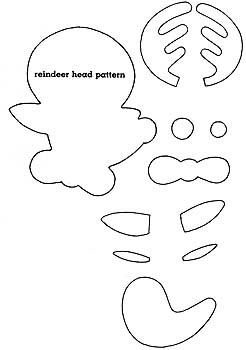
Reindeer Pin
To make a reindeer pin, you will need: different colors of felt, paper, a pencil, scissors, markers, glue, a medium-size safety pin, a needle, and thread.
-
Trace the reindeer pattern pieces onto white paper; cut out.
ImageReindeer Pin -
Trace the copied pattern pieces onto the felt, and cut out. Glue the other pieces to the main head piece, as illustrated. Use markers to add details.
-
Sew the safety pin to the reindeer’s back.
Holiday Treats
Holiday Mud Balls
1 pint whipping cream
1 package (10.5 ounces/300 g) miniature marshmallows
1/2 cup crushed peppermint candy
1 cup pecans, chopped
1 package plain chocolate wafers, crushed
12 peppermint sticks
-
Whip the cream until it is stiff. Fold in the marshmallows, crushed candy, and pecans.
-
Form the mixture into twelve balls, then roll the balls in the wafer crumbs. Push a peppermint stick into the top of each ball; freeze until ready to serve.
Pecan Turtles
1 cup pecan halves
1 bag (14 ounces/400 g) caramels
1 tablespoon milk
4 1/2 ounces (130 g) milk chocolate
-
Grease a sheet of wax paper, then place the pecan halves in groups of five on it, arranging them to form four legs and a head.
-
Heat the caramels with the milk in a heavy saucepan, stirring constantly. When the mixture is smooth, remove it from the heat, let it cool five minutes, then spoon a tablespoonful of it over each group of pecan halves. Refrigerate the turtles until the caramel has set.
-
Melt the chocolate, then dip the top of each turtle into the chocolate; replace the turtle on the wax paper. Let cool. Store in the refrigerator.
Peanut Butter Candy
24 marshmallows
1/4 cup butter
1 cup peanut butter
4 cups crisp rice cereal
-
Melt the marshmallows, butter, and peanut butter in a double boiler until all ingredients are thoroughly blended.
-
Pour over the cereal, mix well, then press into a 10″ x 15″ (25 cm x 38 cm) baking dish. When cool, cut the candy into squares.
No-Bake Eskimo Cookies
1/2 cup butter, melted
1/2 cup sugar
1/2 cup powdered chocolate milk mix
1 1/2 teaspoons vanilla
1 1/2 cups oatmeal
1/2 cup finely chopped walnuts
powdered sugar
-
Mix well the butter, sugar, chocolate milk mix, and vanilla.
-
Add the oats and nuts, and stir until they are coated. Cover and chill the dough for eight hours or overnight.
-
Break up the dough with a fork, shape it into 1″ (2.5 cm) balls, then roll the balls in powdered sugar.
Cherry-Nut Cake
1 1/2 cups sugar
1/2 cup shortening
4 egg whites
3 1/4 cups flour
2 1/2 teaspoons baking powder
1 teaspoon salt
1 1/2 teaspoons vanilla
1 cup milk
1/2 teaspoon almond extract
2 tablespoons chopped maraschino cherries
3/4 cup chopped walnuts
white frosting
-
Cream the sugar and shortening. Beat in the egg whites, then stir in the remaining ingredients except the frosting.
-
Pour the batter into a 9″ x 13″ (23 cm x 33 cm) cake pan, and bake at 400º F (205º C) for 25–30 minutes. If you wish to make cupcakes, put cupcake papers in a muffin tin and fill them about two-thirds full. Bake at 350º F (175º C) for 18–20 minutes.
-
When cake or cupcakes have cooled, frost with white frosting.
Fruit Bars
1/4 cup margarine
1 egg white
1/2 cup frozen apple juice concentrate
1/2 cup frozen orange juice concentrate
1 1/4 cups flour
1 1/4 cups rolled oats
1 teaspoon baking soda
1 teaspoon baking powder
1/2 cup chopped dates
1/2 cup chopped dried apricots
1/2 cup raisins
1/2 cup chopped pecans
-
Beat the margarine, egg white, and concentrates together. Add the flour, rolled oats, baking soda, and baking powder; mix well. Stir in the dates, apricots, raisins, and pecans.
-
Spread in a greased 8″ (20 cm) square cake pan and bake at 350º F (175º C) for about 25 minutes or until lightly browned. When cool, cut into squares.
Illustrated by Dick Brown
Photos by Philip Shurtleff